
Home | Information | Video encoding from Premiere to external encoders using Frameserver
Using Frameserver with Premiere
google translated
For the Adobe Premiere, there are build-in and third-party export plugin allows to export video through the major codecs h.264, vp9, Intel / NVIDIA GPU-encoders. But sometimes their ability to reason or another do not have enough or have limitations as compared with the original codec, such as x264. Then you can use the plugin the Advanced FrameServer, running with the CC 2015.
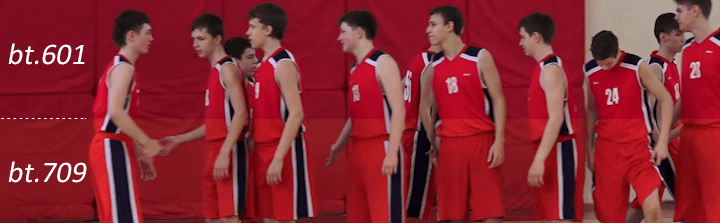
FrameServer works simply - only transmits the frame from the editor (eg Premiere) to encoder (eg ProCoder). In practice, there may be a problem with the color reproduction: the frame, gave Frame Server-th color in the YUV space is encoded in bt.601 profile designed for SD video, and for the need bt.709 HD. Visually, the difference becomes noticeable in bright red and green colors, other colors are more or less correct, grayscale always correct. Because the color profile information is not transmitted, the encoders may not know what to do conversion 601>709, even if they it is able to. As a result, HD video is encoded as it is - in fact, in BT.601, the color profile information to a file or not indicated or indicated incorrectly as BT.709, and further into the player played as BT.709, or because there is no information about the color or half any player HD video plays as BT.709.The result is visible distortion in saturated red and green colors. This problem is quite common, there is a Premiere, Sony Vegas, but can not occur because different versions behave differently in different systems. To control recommend that you choose a short piece of video with the presence of a bright red color or take this image, and encode it. Then compare the resulting video with the original in Premiere.
Export through MediaCoder
1. Install Advanced the Frame Server , remember the path where installed and copy dfscPremiereOut.prm from there to C:\Program Files\Adobe\Common\Plug-ins\7.0\MediaCore
2. Install the latest version of MediaCoder , download and install updates.
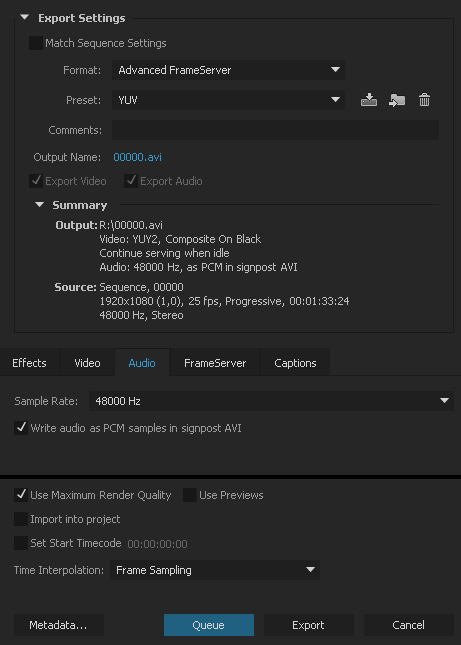
3. We export from Premiere in the usual way (for example, File> Export> Movie), and choose the Advanced Frame Server as a output format.
4. Enter the intermediate filename to export, such as "signpost.avi", set Color space - YUY2 .
5. Click "Export" to start FrameServing.
6. Run Mediacoder and load "signpost.avi", at the Video panel, select Format: H.264, if you have NVidia video card 6xx series and later, you can enable a hardware encoder - select Encoder: NVENC (quality in the Mediacoder`s implementation nvenc in bad).
7 . Click "Start".
8. After the finish of coding in MediaCoder, you can press "cancel" in Premiere. Unfortunately, because of the peculiarities of batch encoding through Adobe Media Encoder, it possibly manually or by setting Watch folder.

To solve the problem bt.601 <> bt.709 this avisynth-script it is necessary to set the path to and signpost.avi download this script as the original video, instead of "signpost.avi" (see. picture below). And you need to change the setting of Premiere export : set Color space - RGB32.
Export through StaxRip
Advanced FrameServer is already installed, we need to download and install StaxRip (version 2.0 beta 1 is described below). In the course of launch, the program will offer to download and / or install the missing components, in particular AviSynth +, which we will need.
In Premiere, we export in the way that is most convenient for you (for example, File> Export> Movie with active timeline) and select Advanced FrameServer as output format. Enter the name of the intermediate file for export, for example, "00000.avi", Color space - YUV2. Click "Export". From this moment, Premier, in conjunction with AFS, every time any external program accesses any frame from “00000.avi” substitutes the corresponding frame from the timeline.
Then continue process from StaxRip: :
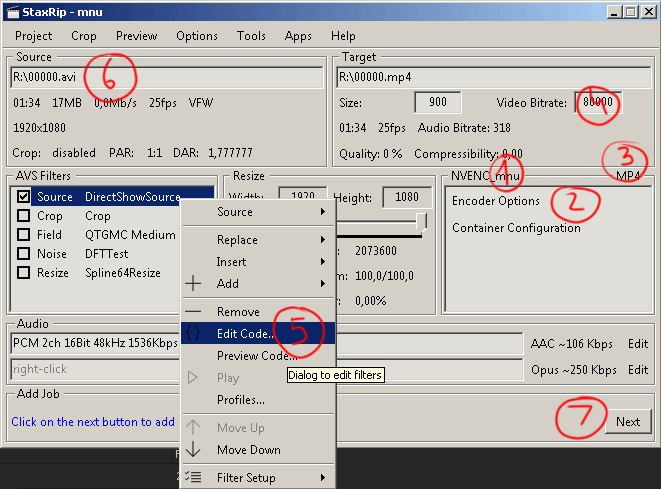
Right away configure and save the project template, in this case the optimal settings for encoding in h264 with the hardware codec NVENC are considered:
1. Select the NVidia / Nvidia h264 encoder (this is the highest quality NVEnc by rigaya codec, also available are x264 / x265, AMD and Intel hardware encoders, and any codec from ffmpeg)
2. Setup quality, speed (for example, Variable bitrate HQ, in Rate Control set Max bitrate to 12000 which will mean the target bitrate to 15 Mb/s)
3. Choose mp4 container
4. Check the value of the bitrate, if there is an inadequate large number, then the encoder will not work, 80,000 bytes per second corresponds to 10 Mb/s.
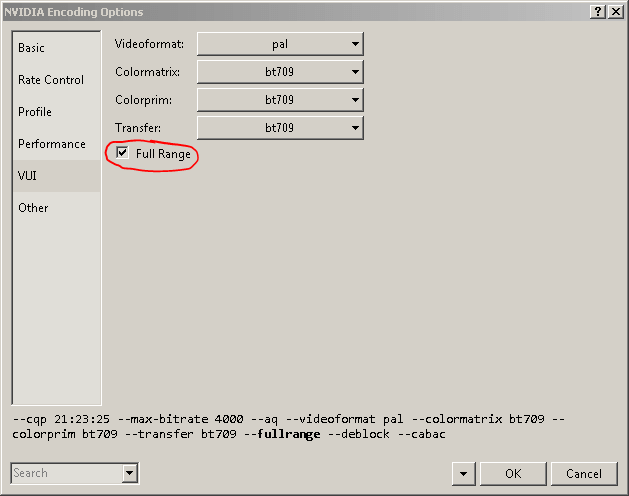
5. Select as the import script DirectShowSource. To solve the bt.601 <> bt.709 problem, right-click the mouse, select Edit Code and change the script to: ConvertToYV12 (DirectShowSource ("% source_file%", audio = False), matrix = rec709 ")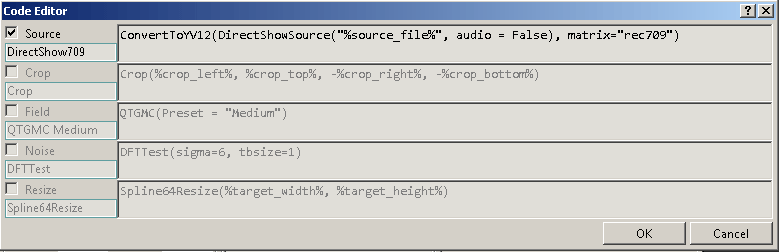
If there are no problems with color, then the script can not be changed, if we exclude the color correction operation, then the speed of work will increase. In the AFS settings in Premiere, you can choose Color space: YUY2, RGB32, RGB24. The x264 encoder is capable of receiving RGB32 and correctly converting it to YUV with the profile bt.709, NVEnc by rigaya understands YUY2 and depending on the version RGB24, but for working with the frame server it needs to correct the color profile. Other codecs may behave in different ways, it needs to be tested empirically.
It is also possible to encode video in the full range of brightness (0-255), for this you need to replace "rec709" in the import script with "PC.709", and in order for the players to know that the video is full range, you need to explicitly indicate this.
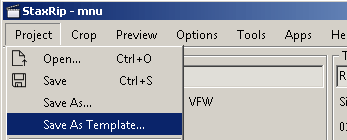
6. Save the template and indicate that it is used when starting the program.
7. Having set everything up, go to the Jobs queue (Next), where you can click Start button. After the rendering is over, export in Premiere can be canceled.
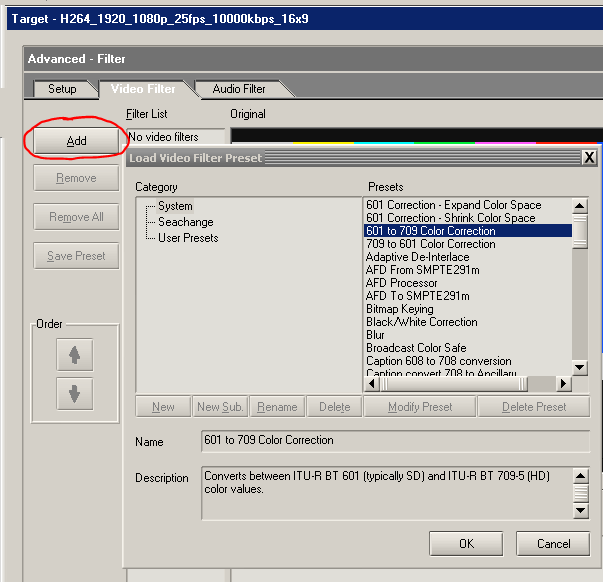
Export through ProCoder
All actions are similar to the previous methods. If you want to solve bt.601 <> bt.709 problem enough in Target |Advanced add a video filter "601 to 709 color correction"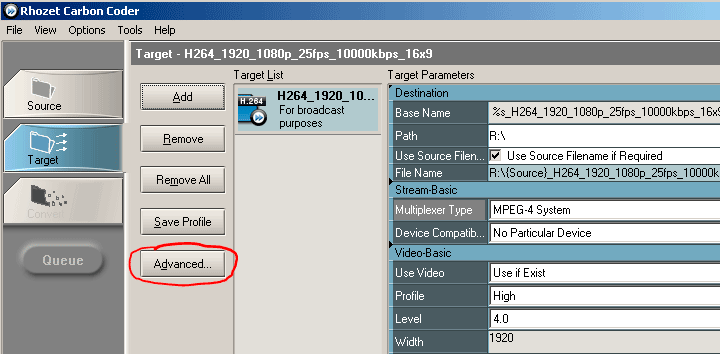
Useful links
http://www.debugmode.com/frameserver/ - Debugmode FrameServer, not working with Premiere
CC
https://groups.google.com/forum/#!forum/frameserver-discuss
https://vk.com/topic-84786662_33494293 - FrameServer и Sony Vegas
http://forums.akross.ru/cgi-bin/ikonboard.cgi?act=ST;f=2;t=6841 - VapourSynth